My Favorite Exercise Combinations: Installment 14 – Improve Your Speed Today

There are tons of ways to improve explosiveness and athleticism. One of the coveted ideas for achieving athleticism involves “triple extension” – extension of the hips, knees, and ankles in a very rapid manner.

Since there are a plethora of exercises can help develop the quality of explosiveness and power, many may throw the baby out with the bath water, instead of identifying the goals of the individual. With this in mind, it is always important to keep in mind these things:

  • Does this person have the requisite joint position to get into the desired position?
  • Does this person have a pre-existing context for which this movement can be taught?
  • Does this person have any soft tissue structures that can be limiting them from moving well?
  • Does this person have any pre-existing anxieties about the movement?

After identifying these items, quickly move on to the fitness side of things, and try this exercise combination out!

Let’s Talk Power

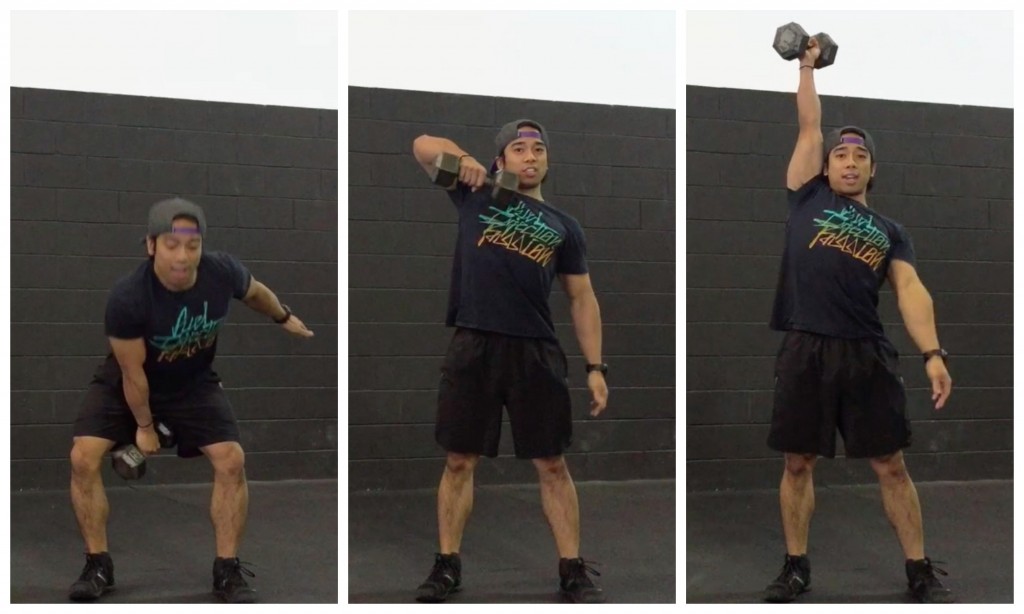
The DB Snatch is a great exercise aimed at improving triple extension in a unilateral fashion. In this exercise you can achieve a lot of great power qualities, on top of improving your ability to stabilize a weight overhead, something not many people can do effectively (simply because they are uninitiated with how to do so).

When performing the 1-Arm DB Snatch, make sure to keep these external cues in mind!

Coaching Cues

  • Throw the weight to the ceiling.
  • Snap your arm like a whip/rope.
  • Head goes to the ceiling.

It is common to be unfamiliar with the movements of the DB Snatch, so make sure to keep these “phases” in mind.

DB Snatch - Phases
Left – Hip Hinge, Middle – High Pull, Right – Receiving Position

However, sometimes individuals do not have the initial ability to bring their arms overhead – they may need better control on how their humerus moves in conjunction with how their scapulae move on their ribcage…

ShoulderMvmnt

… on top of relaxing their neck muscles!

Janda

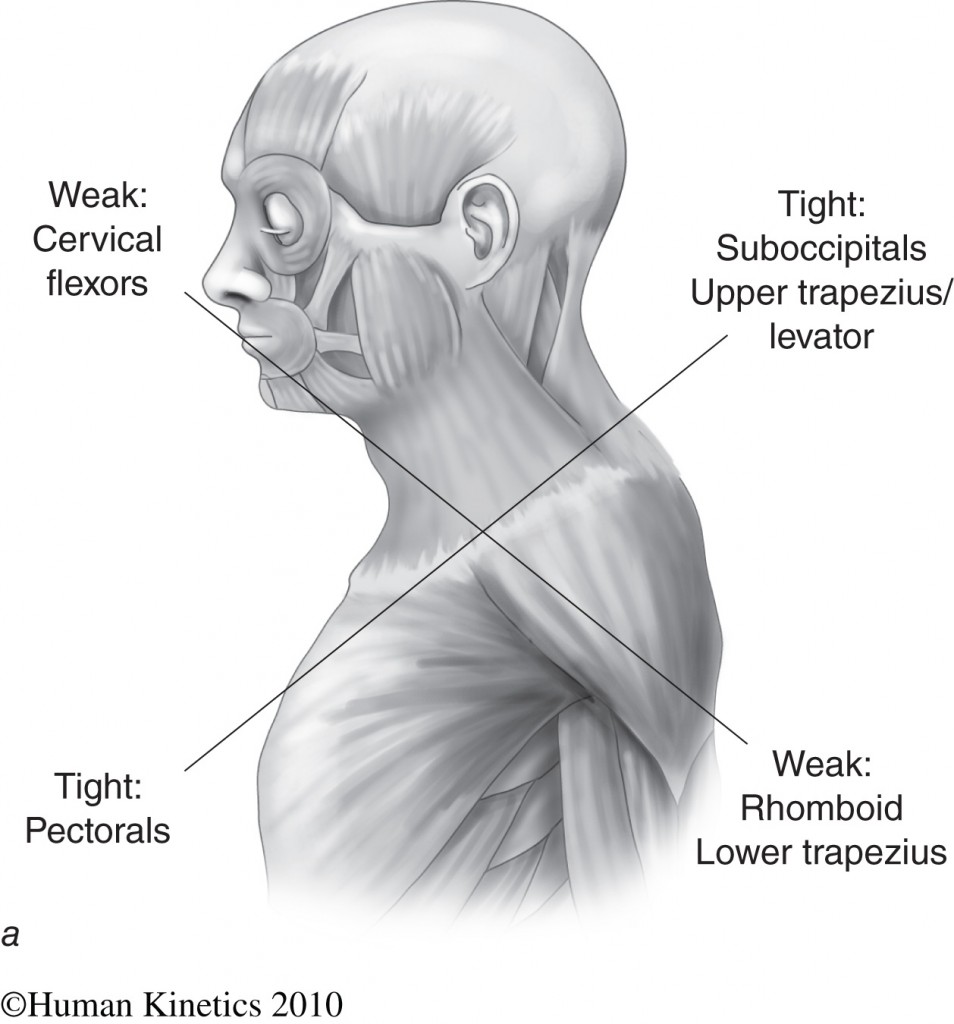
The Shoulder Joint is Connected to the…?

By improving shoulder and scapular stabilizers, you are better likely to improve upon your neck motion. The reasoning for this is because you are now improving how your shoulder feels, instead of often “shrugging” or using compensatory patterns that involves your head/neck to take the brunt of the workload.

By performing the next exercise in this combination, the Supine Band Resisted PNF Diagonals, you are better able to keep reinforce these qualities:

  • Reintegrates anterior core stabilizers (IOs, EOs as you exhale)
  • Reintegrates anterior neck (SCMs as you rotate neck)
  • Improve scapular control (as you hold band in position)

Practical Programming

Ideally, you can super set these movements back and forth. If you’re in a supine position for the band pullaparts, you are in the easiest progression their is – which isn’t a bad thing. Sometimes you need to relax in order to move fast. No one just stays “tight” in order to develop athleticism – you need to move quick, and also relax in order to develop that “whip” like feeling.

So with this in mind, let’s combine these movements in a pairing.

A1. 1-Arm DB Snatch – 3×4/side
A2. Supine Band Resisted PNF Diagonals – 3×8-10/side

One thing to keep in mind is that power development can be justified as being used in the 3 to 6 rep range. As long as force development is the main goal, adequate rest is improved upon, and technique is on point, utilizing the DB Snatch is a great choice of an exercise!

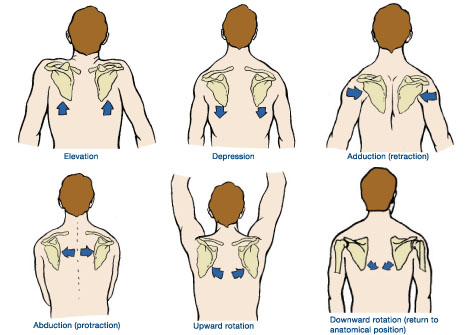
With respect to the band pullaparts, I view these items as simply improving upon the various functions of the scapula and shoulder motion. That is, when you go down by your side, you are performing shoulder extension and scapular retraction/depression. When you bring your other arm up, you are working on shoulder flexion, and scapular upward rotation.

Also, if I am moving my neck after locking my shoulders into position, I am forcing my neck to turn on my SCMs, which help with rotary motion with the neck, something that I is often an issue with our athletes and even everyday folk.

With these things in mind, it is easy to see how you can integrate a great power development exercise, while still respecting the need for your overhead mobility and stability!

As always,

Keep it funky.

MAsymbollogo

My Favorite Exercise Combinations: Installment 13 – Just a Hop, Skip, and Jump Away

Throughout the years of working with youth athletes, I’ve begun to notice a trend – many don’t have the ability to perform coordinated movements that are outside of their specific sports! General biases aside, many athletes do not have the ability to coordinate and move well!

With this in mind, check out this combination of exercises in order to re-educate your body!

Many athletes I’ve come into contact with are in a strange stage of development – they are often just around that age of going through puberty, and they may have gone through a growth spurt or three.

Due to anthropometry changing very rapidly for these individuals, these male athletes begin to lose coordination while they begin to work out what happens when you grow 6 inches in less than 6 months.

This is largely why I believe in performing FMS related screens, as they may have certain passive ranges of motion that allow these athletes (read: baseball athletes who exhibit 180° or more of glenohumeral total range of motion) to succeed at their sport, but when asked to ambulate or move in any other way, they simply cannot due to lack of motor control.

FMS
This is one piece of the puzzle – there are other pieces too!

If someone can score (X) on an assessment, or have awesome ranges of motion, what happens when you ask them to perform a movement outside of that screen? What happens when you test physiological capacity such as an endurance test, or strength related test?

Lately at Cressey Sports Performance we have been identifying certain athletic qualities that many younger athletes have been missing – that is, they do not possess this ability due to early sports specialization. Skipping, shuffling, and hopping are a missing component out of these individuals’ movement dictionary. Initially, there is a noticeable limitation on their literacy in how to transfer force in many different directions!

With this in mind, we’ve begun to break down specifically how to improve these qualities, and I can go into slightly more detail in how the quality of elasticity and reactivity is important as an athlete.

Be Like Water… and Adapt

Essentially there needs to be an immediate reflexive action that needs to occur for jumping to feel bouncy. The quality of the stretch shortening reflex needs to be expanded upon!

“A stretch-shortening cycle (SSC) is an active stretch (eccentric contraction) of a muscle followed by an immediate shortening (concentric contraction) of that same muscle.”

I’ve written about how a baseball athlete’s lack of ability to transfer ground reaction forces may be a limiting factor towards improving velocity (which is essentially power over a given time in a certain direction), along with understanding how an athlete can improve these power qualities.

Further, by increasing one’s ability to coordinate certain limbs moving with and without a jump rope, you are encouraging motor units in those specific muscle groups to be activated by including low level jumping! Also, you can improve upon an athlete’s ability to absorb force, and produce force in an efficient manner.

Essentially there is a motoric item at work here in this combination. You are inducing small levels of force into the ground – and the ground has to push back at you in order for you to leave the earth. Sounds pretty intense, but this is how ground reaction forces work.

Ground Reaction What?

Your ability to put force into the ground comes down to joint position, muscular contraction, along with learning how to eccentrically load in an appropriate manner.

Knee Alignment - Sagittal

If you don’t have the ability to absorb or displace this eccentric force (think of when you load or absorb the forces from landing on the ground), expressing this force as a concentric force will be limited.

The concentric force is where you will be pushing the ground away. This is a relatively difficult concept to understand because many of these speed and power-related movements are done very quickly.

Analogously, if you can lift a weight irrespective of the time it takes to lift the weight, you will be able to display your maximal strength.

However, if you place a premium on the amount of time it takes for you to displace that weight (or how fast you can move that weight), then we are looking at power!

Fortunately for a lot of you reading and for your athletes, you won’t need to displace that much force in comparison to lifting a weight. You aren’t even jumping for a maximal height, because you’re still learning the mechanics and technique, which is different than putting maximal effort into a movement.

The most you are looking to jump is the thickness of a jump rope (which isn’t that much) – but you are doing it very quickly.

How Can I Use This Combination?

I use several cues for many of my athletes. Most of my athletes are still in the younger age range (12 to 16), and even if they aren’t I use some funny cues to get them to laugh and then the message sticks even better:

Remember that game where you used to think the colored tiles in a grocery store were lava? Sometimes you HAD to step off the white tiles onto the colored tiles in order to continue, but you did so super duper fast!

Think the ground is lava, and you have to spend as little time as possible on the ground.

After that, make sure your knees aren’t buckling every step of the way – maintain a certain level of rigidity as you move through this drill.

Integrating this into a Pop, Float, Skip drill, you will need to maintain a certain level of rigidity as you learn to skip on one leg, and pop and float on the other leg.

Programming

Many use jumping rope as a method for conditioning. When you understand the ramifications of this tool, it can also double as a low level elasticity drill, and you can integrate it in several different manners. In this case, I choose to enhance use it as a learning tool on top of inducing small levels of jumping into the body!

Personally, I often find that the last time an athlete felt this type of bounciness was sometime in grade school when they were given time for recess, dodgeball, kickball, four square, and all these other games that are no longer part of our youth athlete’s day to day happenings.

For programming, I like to teach the concept of elasticity and upper body rigidity first. Afterwards, teaching coordination of the upper body with skipping takes place, and then integrating a “pop, float, skip” exercise is useful for athletes before sprinting takes place!

A1. Jump Rope – 2×20 reps (Fast and Reactive!)
A2. High Knee Skip – 2×10 Yards
A3. Pop, Float, Skip – 2×5 Yards

Further, you – the teacher, coach, and trainer – should allow mistakes to happen. Learning a skill set takes time. It doesn’t happen right away. Learn when to give cues, and learn when to back off so the athlete can learn on their own.

As always,

Keep it funky.

MAsymbollogo

My Favorite Exercise Combinations: Installment 12 – The Hip Bone is Connected to The Knee Bone

Before I begin, I just want to comment and mention that many individuals want to begin talking about pathoanatomy and all of the complex items that happen in the body, but not many even master the basics and fundamentals before moving onto said items!

In fact, Tony Gentilcore had a funny quip to a tweet I had ranting about this very item.Tony G Tweet

With that under your belts, let’s dive into my newest and most favoritest exercise combination!

The Hip Bone is Connected to the Knee Bone

One common theme that happens quite a bit in many populations that I come across involves the knees exhibiting genu valgus. This is a fancy schmancy word meaning the knees cave in – this could be due to a few things:

1. Increased q-angle, in which a line is drawn from the anterior superior iliac spine (ASIS) to the center of the patella, and another line is drawn from the center of the patella to the middle of the femur.

qangle

2. Over-pronation of the medial arch of the foot, in which the arch of the foot is rolled inwards. If the foot collapses, the tibias could lose integrity and also fall in height as well, thus causing the patellas to fall towards one another.

Arch vs No Arch

3. Lack of hip internal rotation, which could be due to several factors, such as:

  • Lack of abdominal contribution in controlling the motion of the pelvis during gait
  • Lack of strength in glute medius
  • Lack of space in the posterior portion of your hip capsule due to congenital (or you were born with it) reasons
  • The individual does not know how to control the range of motion given to them

…among many others such as contact and non-contact injuries.

Look here for more information on hip internal rotation.

Observations vs Pragmatic Actions

So the mere observation of said information does not help us, rather we (you and I) can intervene in a few ways:

  1. Perform rehab like exercises in order to improve what we are looking at.
  2. Improve gait patterns (over-pronation, reduce postural swinging during gait, etc.)
  3. Improve the individual’s ability to control their body during athletic movements

Today I’ll be going over how to improve option three, in which I introduce the single leg hop where the landing is “stuck,” paired with a single leg squat, or bowler squat, with a subsequent medial band pull.

The single leg hop is a great regression or even beginning assessment tool to see how an individual interprets how to accelerate away from the ground, along with how they decelerate and negotiate gravity.

When an individual lands, a few incorrect items may occur:

  1. Lack of sticking landing (hopping instead of absorbing force)
  2. Overpronation
  3. Knee collapse
  4. Landing too “tall” or high, as opposed to a lowered position

Long story short, I am looking for alignment of the foot, knee, and hip.

Knee Alignment - Sagittal
Left: Good alignment when landing from a vertical hop. Right: Bad alignment when landing from a single leg vertical hop

Further, starting and ending with a lowered position allows an individual to react appropriately with respect to athletic endeavors – if the athlete lands in a higher position, there is less ability to decelerate using the posterior chain/glutes, and more likelihood the person will have to lower themselves in order to get faster, which takes time they could have saved if they just landed lower to begin with.

The bowler squat with a medial band pull requires the individual to maintain all of these alignment items, along with maintaining a lowered center of gravity.

Single Leg Medial Band Pull
The band is pulling the outside knee into valgus/collapse. The brain will recognize this and fight back, hopefully.

I’d also increase the demands by requiring the athlete to pause for 2 seconds at the bottom position, which will take any momentum out of the equation, and challenge their core integrity.

Note: When you have the band pulling on the leg, make sure your most outside leg has the band pulling them inwards toward the midlineotherwise you are assisting your knee in maintaining appropriate alignment. The purpose is to challenge the vestibular and nervous system by pushing the body out of alignment!

How Can I Program This?

I believe this can be a great precursor towards improving frontal plane development, or even single leg forward hops or bounds. For this reason using this as a “reminder” in the warm-ups may be the best bet.

A1. Single Leg Hop (Stick Landing) – 3×5/s

A2. Bowler Squat with Medial Band Pull with 2 Sec Pause – 3×4/s

Make sure to use a slightly less challenging band, because a very strong, or one inch or thicker band, may be too difficult and might hurt more than help!

As always,

Keep it funky.

MAsymbollogo