Asymmetry and the 90/90 Hip Shift

This is an article on the 90/90 Hip Shift, and is the second part of a four part series involving the 90/90 Hip Lift and beyond. The first part may be found here:

Understanding How Your Body Moves

This describes the neural pathway for the brain to send signals to skeletal muscles.

So, the brain senses and sends signals to muscles. Then, these muscles pull on bones, and if given enough proximal stability in one area, then the distal region of that same bone will begin to move. Then, the bones’ joint articulations will touch and approximate on another joint, which will allow for specific ranges of motion to be expressed.

When the femur goes into flexion relative to the acetabulum, the femur needs to move posteriorly within the hip capsule.

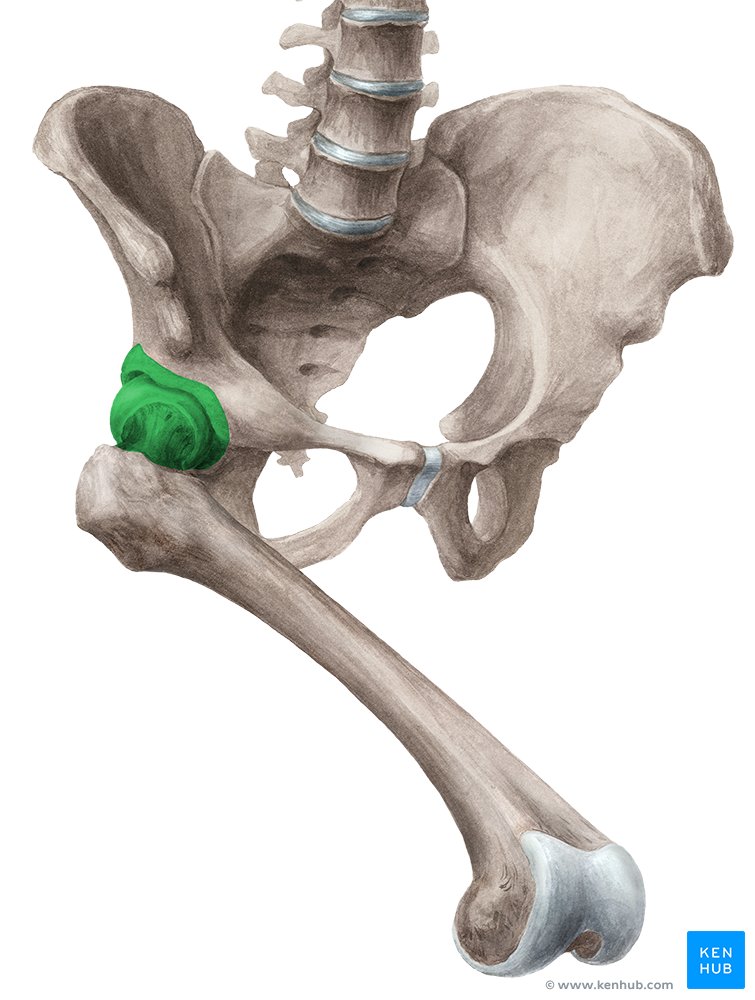
For example, if the brain sends motor signals to the hip internal rotators to move, the muscle fibers of the hip internal rotators will begin to rotate the femur within the hip. Then, once the femur reaches its end range of motion within the acetabulum, if there is more desire to move than is expressed, there may be excessive (or inefficient) movement found at the knee (where the distal femur articulates with the tibial plateau), or further in up beyond the pelvis (in the lower back, for example).

Hip Internal Rotation is expressed by the femur moving posteriorly within the hip capsule. If movement is limited here, where else will movement occur?

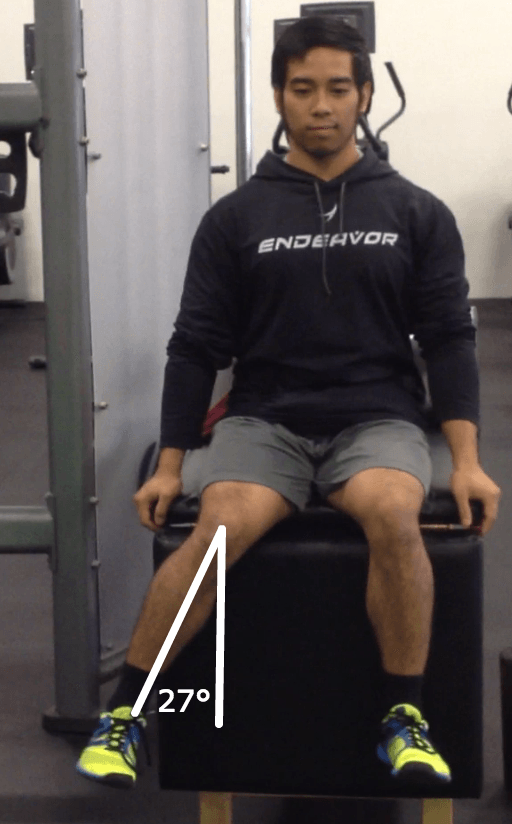
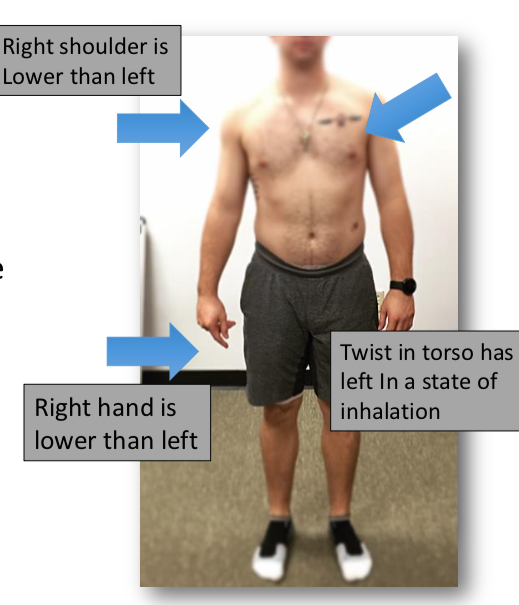
Now, extend this concept globally to the whole body, and not just at a singular joint. If your body tends to have a right sided bias, and a rotary component leaves your body with the above ROM…

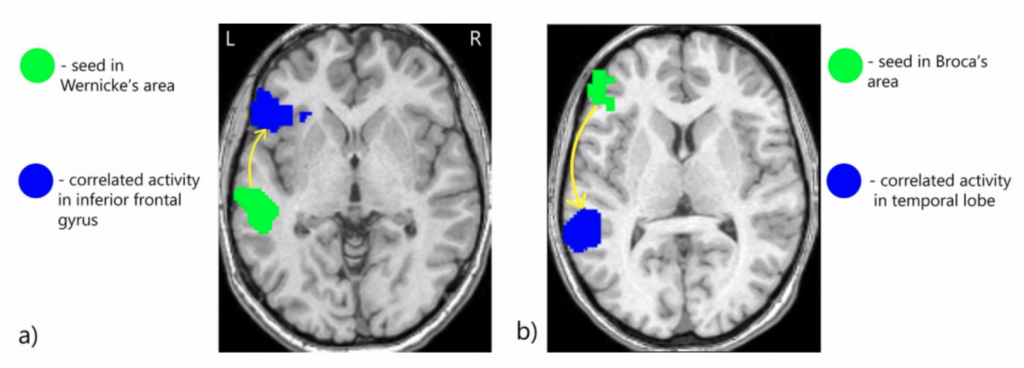
…is it possible to inhibit musculature that is leaving your right shoulder with a lack of internal rotation, without directly affecting the specific area? I’d argue yes, you can.

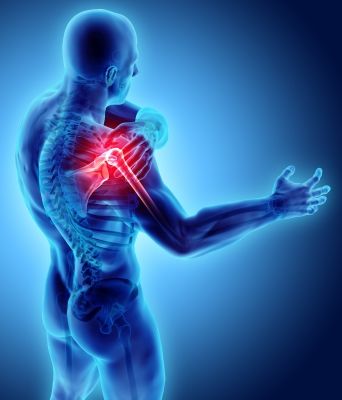
The reason being is that your arm is simply not experiencing a lack of shoulder internal rotation, but it is also experiencing a lack of trunk rotation (to one side), a lack of hip rotation (in one side), along with possible cervical rotation asymmetries.

Further, there may even be different values found at the ankle region for supination, pronation, dorsiflexion, and plantarflexion. All these reasons could be potential reasons why there is a lack of shoulder internal rotation deficit, which could, and should be accounted for as well.

There is an asymmetry found in all individuals, and it is expressed in greater detail in athletes that play rotationally demanding sports.
What does thoracic rotation, tibial rotation, ankle supination/pronation, etc look like in this individual?

With this said, perhaps an exercise can identify how to restore trunk rotation, cervical rotation, hip rotation, and ankle motion, which will then allow your shoulder internal rotation to be restored – without even doing an arm exercise to begin with.

Your body works integratively, and it can recognize when there is greater range of motion in another area adjacent (or not adjacent) to it, which will allow your body free up movement in said adjacent area. At its simplest, this phenomenon is called regional interdependence.  (1) Other models may discuss this within the context of self-organization and motor control. (2)

There are certainly many different exercises that can improve upon shoulder internal rotation via the principles of regional interdependence, neuromuscular adaptations, and motor control.

With this said, I’ll be discussing the 90/90 Hip Shift from the Postural Restoration Institute.

What is the 90/90 Hip Shift?

The 90/90 Hip Shift is another foundational exercise from the Postural Restoration Institute (PRI). Much like the 90/90 Hip Lift, the 90/90 Hip Shift is also often taught in the foundational courses from PRI, and is the next level used to help integrate the body together.

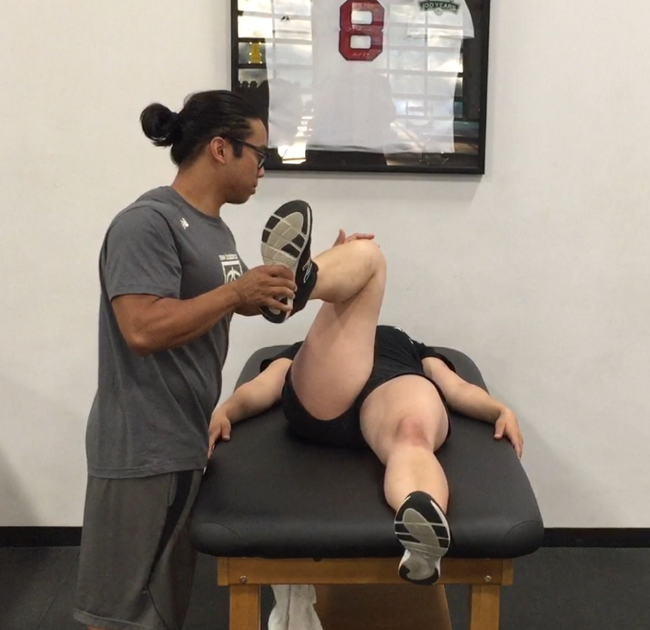
The 90/90 Hip Shift is performed in a supine position (on your back), with your feet on an elevated surface, and knees in a flexed (or bent) position.

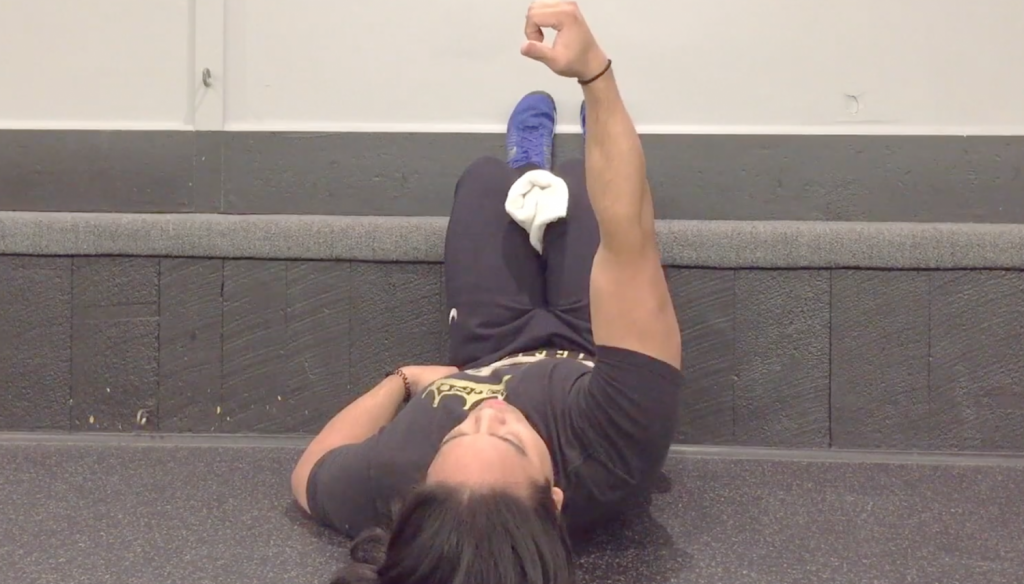
More often than not you’ll have something between your knees, not just as a formality, but used to help feel and sense differences in position between one leg’s position, and another leg’s position.

At the end of the day, this exercise is a neurologically based exercise, that is often utilized to identify and treat biomechanical issues that arise from lower body, the lumbar spine, along with any knee issues as it relates to force absorption, along with subconscious movement (such as activities of daily living, walking, running). I bring up the subconscious aspect because by performing this activity, you don’t need to constantly monitor movements day to day, watching every movement and every activity that you perform.

Populations That May Benefit

  • Athletes that utilize asymmetrical patterning (throwing, one-handedness, rotational athletes, track athletes that sprint on the track, etc)
  • Individuals that are asymmetrically biased for work or in activities of daily living (drivers, individuals who carry bags on one side all day)
  • Individuals that may have an injury on one side (lower body, thoracolumbar asymmetry, etc)
  • Individuals that may be experiencing a lack of shoulder internal rotation
  • Individuals that may be experiencing hip impingement-like symptoms with hip flexion and hip internal rotation
A closing angle joint pain or hip impingement with hip flexion and adduction may be an indication to utilize these asymmetrical strategies.

Purpose for Using This Exercise

So the purpose behind using the 90/90 Hip Shift is a bit different than a simple bilaterally based exercise (such as the 90/90 Hip Lift), which did not bias towards one specific side.

In this case, the 90/90 Hip Shift is an exercise that can re-orient the nervous system to account for the potential biomechanical discrepancies that may be present, and improve upon the nervous system’s ability to self-organize and locomote.

Further, much like I explained in the first article (The 90/90 Hip Lift), there are kinesiological asymmetrical differences in the right versus left side of the human body.

Heart on the left, liver on the right, and a diaphragm that has a larger crus attachment on the right side.

The 90/90 Hip Shift is an exercise that is aiming to improve upon this natural asymmetry in the body, prior to any further behavioral asymmetries exacerbate into an orthopedic problem. Or, in other words, this exercise’s purpose is to reduce any physical discomfort or problems brought about by this one-sidedness, and hopefully address it before any more difficult problems arise (bony impingements, capsular problems, etc).

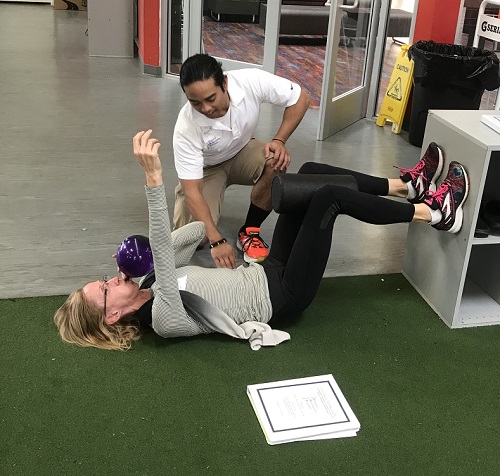
Instructions for the 90/90 Hip Shift

PRI Instructions Verbatim:

  1. Lie on your back with your feet flat on a wall and your knees and hips bent at a 90- degree angle.
  2. Place a 4-6 inch ball between your knees.
  3. Inhale through your nose and exhale through your mouth, performing a pelvic tilt so that your tailbone is raised slightly off the mat. Keep your back flat on the mat.
  4. As you maintain a hip lift, shift your left hip down and your right hip up so that your right knee is slightly above the left.
  5. Slowly take your bent right leg on and off the wall so that your right thigh comes toward your chest. You should feel the muscles behind your left thigh and left inner thigh engage.
  6. Perform 3 sets of 10 repetitions, 1-2 times a day.
  7. Repeat for other side (my instructions).

Competency in the 90/90 Hip Shift

The next step involves understanding how to hold the previous movements’ lessons, and how to incorporate the next components involved with the 90/90 Hip Shift.

Table B: Movements of the 90/90 Hip Shift (into the right side) with a picture of the beginning position of the 90/90 Hip Shift

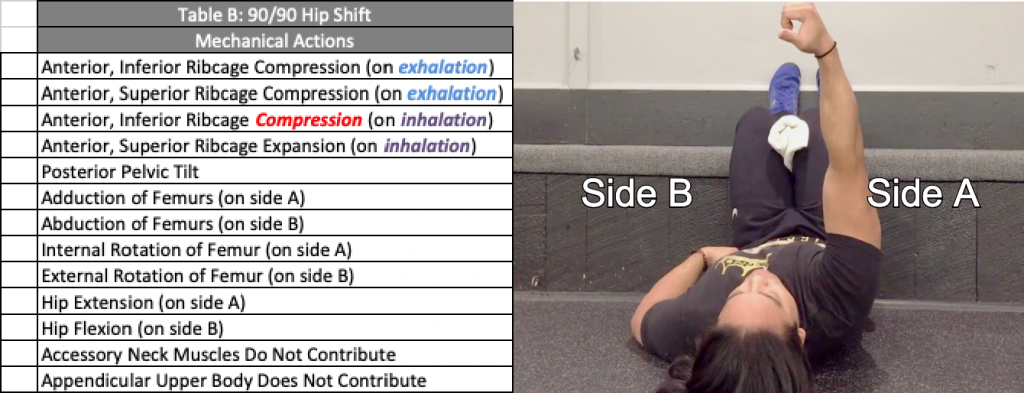
With Table B, there are roughly 13 items that need to take place before moving on. If they don’t take place, can you really say you’ve achieved an authentic 90/90 Hip Shift? Some other questions to help improve confidence in the acquisition of these motor strategies involve:

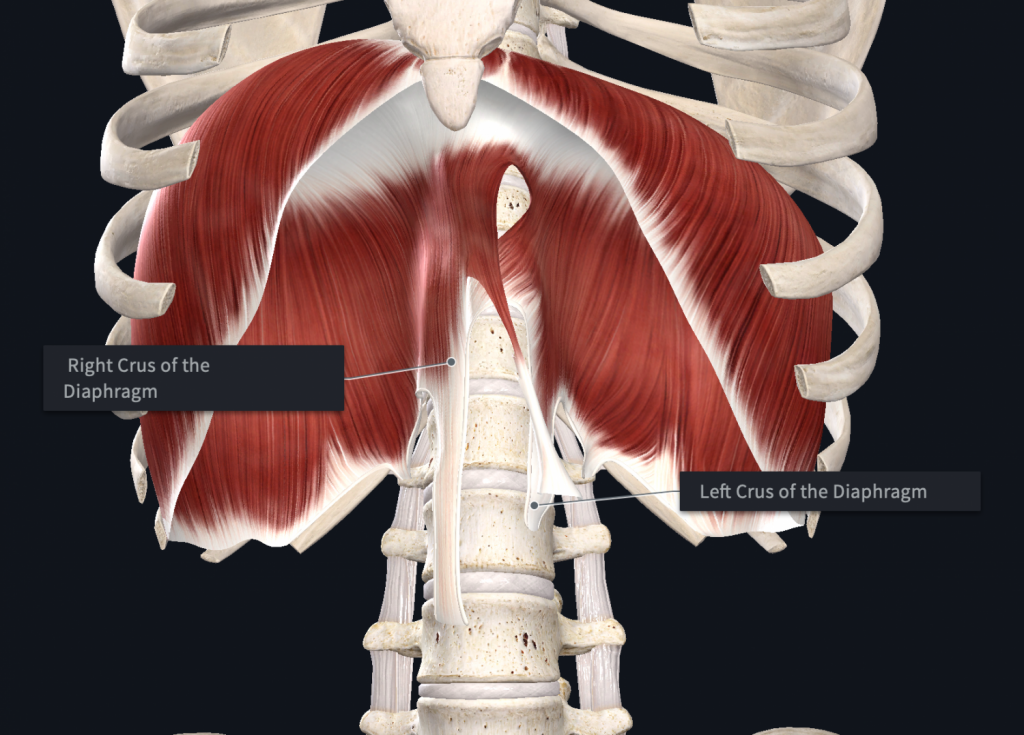
  • Achieving hip adduction in one side, with concomitant hip internal rotation may further stabilize and anchor the leg (side A).
  • While you’re achieving hip adduction of the femur and hip internal rotation on one side, can you also acquire hip abduction and hip external rotation of the other side (Side B)?
  • Can you confidently say you’ve achieved these items (in Table B) without losing the original 90/90 Hip Lift position as well?
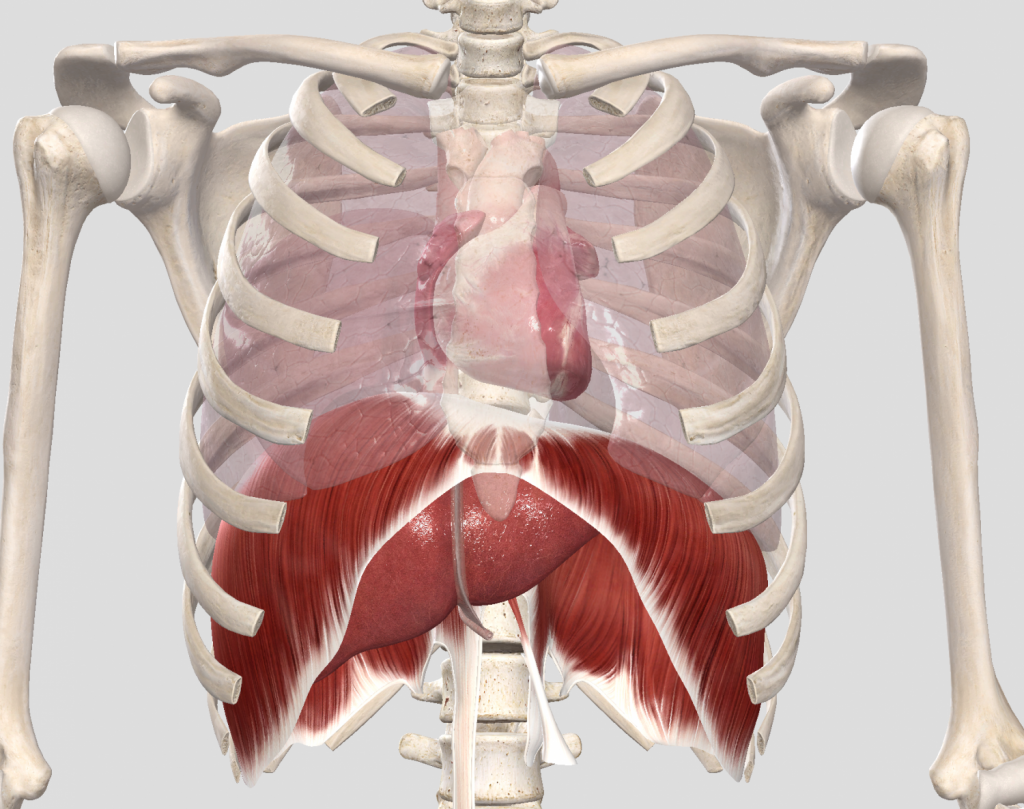
  • Can you say you’ve achieved an appropriate zone of apposition if your accessory neck musculature helps breathing during these unilaterally based movements?

Biomechanical Reasoning

So, if a rotational athlete (baseball player, tennis player, etc) performs hundreds to thousands of rotations to improve at their sport (hitting, throwing, etc), chances are they will begin to create a body that is made for that sport. In other words, there will be soft tissue adaptations, and more likely structural adaptations, that will allow the individual to excel at the sport they are playing.

Structural adaptations, or neurological adaptations…?

There may even be differences from dominant arm to non-dominant arm, along with ability to rotate (trunk rotation) which measures the ability for the spinal vertebrae to rotate, along with lower body contribution to performance based asymmetries found in the body. (3) (4) (5) (6) (7)

Let’s say we hypothetically have a baseball pitcher with the following upper body range of motion (ROM) values:

Right Handed Pitcher (High School/College)

  • Supine Shoulder Internal Rotation (Right): 45°
  • Supine Shoulder External Rotation (Right): 130°
  • Total Shoulder Motion (Right): 165°
  • Supine Shoulder Internal Rotation (Left): 90°
  • Supine Shoulder External Rotation (Left): 100°
  • Total Shoulder Motion (Left): 190°

At first glance, this may make sense – the right-sided dominance (right hand pitcher) may exhibit greater range of motion in shoulder external rotation due to pitching demands, and likewise decreased motion in shoulder internal rotation due to the eccentric control found from throwing.

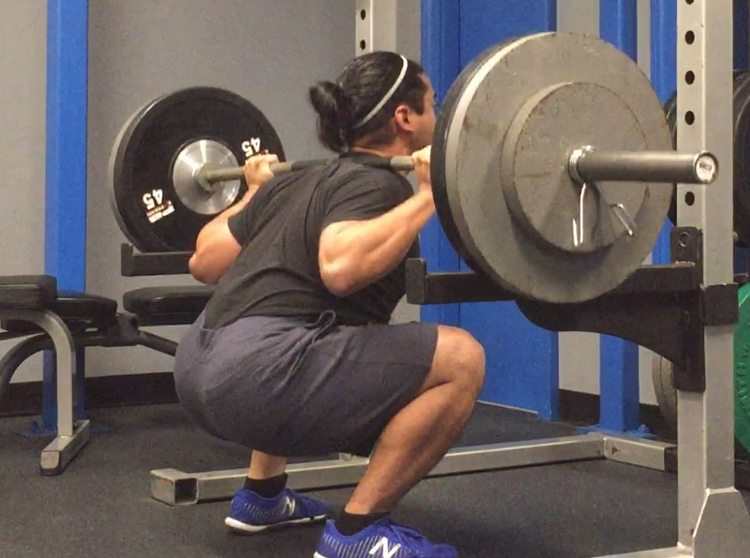
You do all of the “correct” things a practitioner would do in this situation – no bench pressing, no pull-ups, no barbell back squatting, etc. This is done to prevent any biomechanical issues in the weight room from exacerbating the sports specific movement found in the field.

Further, you also pay attention to evidence based research, and understand the differences within the context of GIRD (glenohumeral internal rotation deficit), which accounts for the bony adaptations (Wolf’s Law) found through repetitive force and stress on the body. The SAID principle dictates that “the human body adapts specifically to imposed demands.” All of this holds water, because if there are structural adaptations, they will be present in the body when properly identified through passive ROM assessment.

However, what happens if there are surgeries, procedures, or techniques that have slight risk with them (eg, dry needling, manipulation, etc) that focus on improving these often debilitating or painful regions of the body, when in reality those areas are a result of this asymmetry? Is it possible to restore this asymmetry, and forego any detrimental procedures that can’t be taken back?

To take it to the next level, there can even be DEXA scans to identify different bone mineral density in the whole body, which, if I were to surmise, there would be greater bone density in the dominant arm and dominant leg (the left leg for right handed pitchers, athletes, etc.) (13)

A DEXA scan can identify density of your bones between different regions of your body, including left and right asymmetries. (Ireland)

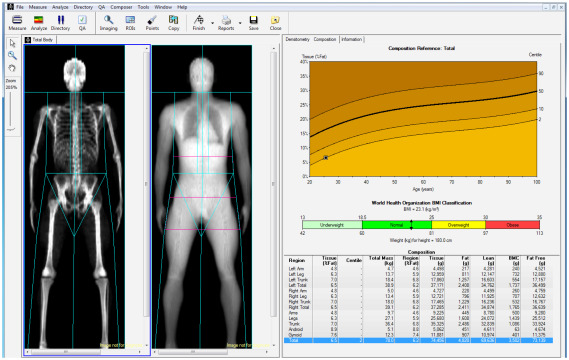
Even with DEXA scan identifying differences in greater bone mass in one region versus the other, is it possible to restore neurological asymmetry despite structural asymmetry?

So, what do you do with this information? Do you simply let it go, and assume it can’t be changed? What if there is something you can do to improve upon one region of the body, in order to affect another region of the body (indirectly)?

My purpose here is to hopefully say yes, and begin to re-allocate physical stressors asymmetrically, and to stress the other side as well.

90/90 Hip Shift and the Gait Cycle

For ease of understanding the 90/90 Hip Shift, the purpose of shifting femurs and hips is reminiscent of the gait cycle, more specifically swing and stances found in the lower body.

The phases of the gait cycle

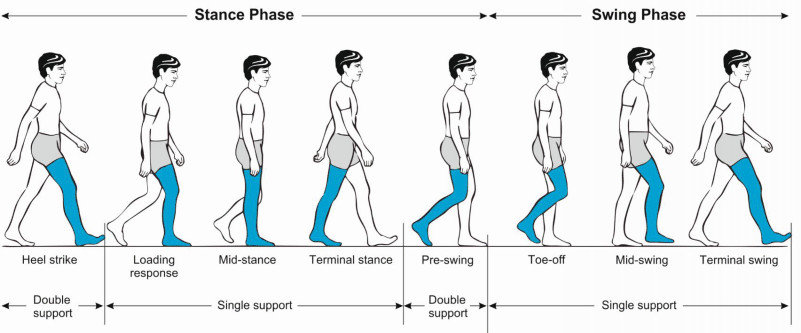
Understanding the basics of the gait cycle will allow one to understand what is specifically going on with the 90/90 Hip Shift. Specifically, there are two phases of gait that are important here – stance, and swing. These two phases are not only evident in walking, but it is also translatable towards movements in the gym.

With respect to the 90/90 Hip Shift, there are ALSO two phases of gait. When one side is “weight-bearing” it is in the stance phase, and the “swing” phase is experienced on the other side. This is also reflective of the musculature that is synonymous with swing and stance phases of the gait cycle.

For example, when performing a 90/90 Hip Shift on the right side of the body, the foot is integrated and in a mid-stance position with the foot experiencing the windlass mechanism, along with the adductors, well adducting, and hamstrings stabilizing a pelvis on top of a stabilized foot.

This side is weight bearing, thus it is in the “stance phase of the gait cycle.”

With the left side of the body, the foot should experience a degree of supination, with concomitant left femoralacetabular (FA) external rotation.

90/90 Hip Shift on the Right Side

The gait cycle involves more than just the thighs moving underneath a torso and upper limbs flailing about. Rather, movements in the gait cycle are also reflected in the…

  • Thoracic region
  • Pelvic girdle
  • Tibiofemoral joint
  • Ankle complex

The execution of the 90/90 Hip Shift is similar to the 90/90 Hip Lift, in that that the first components of the movement need to be obtained. So, if you need to teach your body how to perform a posterior pelvic tilt, you will often need to acquire that motor skill before performing the 90/90 Hip Shift, because it is a bit more nuanced than simply getting “global” motion on both sides.

The “Why” Behind Integration in the 90/90 Hip Shift

Integration on a mechanical level involves not just respecting the lower body’s contribution to the gait cycle, but also the upper body’s limbs, trunk stabilization, and acceleration of all of these pieces as well. In fact, upper and lower body limb movements are coupled (or working together) despite the upper body being immobilized in this specific study. (8)

Walking is much more than feet just hitting the ground.

Now, before the argument for training these movements is reduced to “this is simply the gait cycle,” understand that the body does much more than place one foot in front of the other.

With this said, the bipedal nature of the gait cycle is quite literally an evolution out of our quadruped primate ancestors. (9) There are certain features that are borne out of an evolution towards a bipedal gait cycle. These involve different depths of joint sockets, the different densities of certain bones such as the vertebrae, femurs, and tarsal bones, which all allow for greater ability to weight bear, along with many other structural items that dictate greater access to not just walking on two feet, but also the need to hold, grasp, and manipulate items with our hands.

Further, there is understanding that altering stride frequency, stride length, along with understanding the kinetic and potential energies involved with bipedal walking allows us to understand how this evolution is beneficial towards energy consumption as well. (10)

So, with all this being said, understanding everything above the pelvis (trunk and upper limb contribution) is also important towards completing your understanding of the gait cycle. (11) (12)

Performing Both Sides of the 90/90 Hip Shift

Now, I realize I made an argument for identifying asymmetry on one side of the body, particularly a right-sided asymmetry, especially those that may be involved with rotational sports. However, there is more than just a structural or kinesiological asymmetry present in our bodies, but rather there is a neurological asymmetry present with our brains and how it delivers information, and receives information as well.

With this said, there is a huge contention within those that are merely exposed to a little bit of information from PRI that when you do the 90/90 Hip Shift, or almost any asymmetrical exercise within this context, that you need to only acquire the left side of the body. I’ll address this here and now:

Acquire competency in the right side of the body first.

Yes, it is understood that range of motion that is being assessed, and it is often expressed in a unilaterally and asymmetrically biased fashion.

However, if there is “competent” control of the right side of the body, then going into femoralacetabular (FA) internal rotation, femoralacetabular (FA) adduction (among other movements), then surely you would also have adequate and “competent” control of the other side (left side) of the opposite movements – FA external rotation and FA abduction. If you don’t have authentically own a right side, then you surely don’t authentically own a left side.

So in layman’s words – you need to express range of motion in your right side, before continuing onto the left side of your body. The right side of your body may have the capacity to express certain ranges of motion, but this may be only due to the biological differences that are found in your body, not through willful motor competence.

To be clear, an individual who is expressing an asymmetrical pattern (such as right-sided or right dominant motor control or ranges of motion) is often moving secondary to a neurological and asymmetrically oriented pattern found in the brain. They are neither in control of their right nor left side – but rather they are moving without appropriate executive control of their body. To “own” both sides, you’ll need to first master one side – and by mastering one of these sides, you will be that much closer to owning the next side.

In Review

  1. Understanding that there are asymmetries in the body, regional interdependence, among other principles, allows a practitioner to improve ROM in one region of the body, without necessarily affecting area directly.
  2. Athletes and other individuals who use one side consistently and constantly may experience a greater expression of these asymmetries via ROM throughout the body.
  3. This exercise, among many others, is aiming to replicate the biomechanical, musculoskelatal, and neurological stresses that are experienced in the gait cycle.
  4. Re-orienting the body’s position can help self-organize one region of the body in order to reduce stress and improve degrees of freedom in another region of the body.
  5. It may be possible to identify these asymmetries through bony adaptations through a DEXA scan.
  6. The nature of walking with two limbs (bipedal) is borne out of an evolutionary development, and its processes can reflect metabolic efficiency, along with greater ability to manipulate and grasp tools, along with communication.
  7. Acquiring one side of the body on a neuromuscular level may be more advantageous due to the natural bias that is in place from kinesiology – aka acquisition of the right side of the body.

Admittedly, this is a lot of information to digest. But after taking close to twenty Postural Restoration Institute courses, this is the bulk of reasoning that I can offer when speaking about the 90/90 Hip Shift, and postural (and neurological) asymmetry.

Stay tuned for the next article, where I’ll go over integration beyond biomechanics in the 90/90 Hip Shift.

As always,
Keep it funky.

References

1 – Wainner, Robert S., et al. “Regional interdependence: a musculoskeletal examination model whose time has come.” (2007): 658-660.

2- Davids, Keith. “The constraints-based approach to motor learning: Implications for a non-linear pedagogy in sport and physical education.” Motor Learning in Practice. Routledge, 2010. 23-36.

3 – Robb, Andrew J., et al. “Passive ranges of motion of the hips and their relationship with pitching biomechanics and ball velocity in professional baseball pitchers.” The American journal of sports medicine 38.12 (2010): 2487-2493.

4 – Laudner, Kevin, et al. “Thoracolumbar range of motion in baseball pitchers and position players.” International journal of sports physical therapy 8.6 (2013): 777.

5 – Freehill, Michael T., et al. “Glenohumeral range of motion in major league pitchers: changes over the playing season.” Sports health 3.1 (2011): 97-104.

6 – Ryan, Gary J., and Andrew J. Harrison. “Technical adaptations of competitive sprinters induced by bend running.” New Studies in Athletics 18.4 (2003): 57-70.

7 – Roetert, E. PAUL, TODD S. Ellenbecker, and SCOTT W. Brown. “Shoulder internal and external rotation range of motion in nationally ranked junior tennis players: a longitudinal analysis.” Journal of Strength and Conditioning Research 14.2 (2000): 140-143.

8 – Kuhtz-Buschbeck, Johann Peter, and Antonia Frendel. “Stable Patterns of Upper Limb Muscle Activation in Different Conditions of Human Walking.” Brazilian Journal of Motor Behavior, vol. 9, no. 1, 2015, doi:10.20338/bjmb.2015-0005.

9 – Ceunen, Erik, et al. “On the Origin of Interoception.” Frontiers in Psychology, vol. 7, 2016, doi:10.3389/fpsyg.2016.00743.

10 – Vaughan, Christopher L. “Theories of bipedal walking: an odyssey.” Journal of biomechanics 36.4 (2003): 513-523.

11 – Nott, Cameron R., et al. “All joint moments significantly contribute to trunk angular acceleration.” Journal of biomechanics 43.13 (2010): 2648-2652.

12 – Goudriaan, Marije, et al. “Arm Swing in Human Walking: What Is Their Drive?” Gait & Posture, vol. 40, no. 2, 2014, pp. 321–326., doi:10.1016/j.gaitpost.2014.04.204.

13 – Ireland, Alex, et al. “Upper limb muscle–bone asymmetries and bone adaptation in elite youth tennis players.” Medicine & Science in Sports & Exercise 45.9 (2013): 1749-1758.APA

How to Approach Exercise Programming When Every Sport is Cancelled or Shutdown

In the US, just about every professional, college spring season, and high school spring season sport are cancelled. In the meantime, strength coaches, performance coaches, and trainers across the nation (and world) are maybe left out of work, or have scrambled in the recent weeks to create workouts for athletes to perform at home with no equipment, or limited equipment. With this article, I will be going over how to approach exercise programming when every sport is cancelled or shutdown.

When it comes down to creating programs for sports, there is often time, energy, and attention paid towards certain blocks during any given calendar year: the off-season, pre-season, in-season, and post-season.

During the off-season, there are a number of adaptations, based on the sports demands and individual demands of certain positions, that are often trained to allow an individual to express capacity in their sport, along with the capacity for training sports specific movements.

In baseball, there is often a desire for increasing force production for short bursts of explosive power demonstrated in several movements (pitching, hitting, sprinting). In soccer there is often a desire for increased aerobic endurance, which helps to sustain energy system demands for the sport, but also to improve upon how the body will recover in between bouts of sprinting.

No matter the sport, there will be often be certain desires for one (or a few) specific enhancement(s) of a physiological quality over another, and with that, there will come with it a subsequent focus in exercise programming.

Different sorts of exercise programming will dictate different sets, reps and then different exercise sets, repetitions, and rest times in between. These, among other variables, will dictate the intensity levels that are experienced by the athlete who is exercising.

But what happens when there is an interruption to training, much like the extended off-season many spring sport athletes are experiencing now?

Changes or Interruptions to Your In-Season

If approached correctly, the off-season is a time where an athlete can build capacity, improve neuromuscular strength, hypertrophy, and perhaps speed and power as well.

With the in-season, depending on how long your season may be, some of these physiological qualities may see a decrease in quantitative values. Meaning, from a maximal strength perspective, there may be a decrease in the RM value in various exercises that were previously trained during the off-season. Further, since speed qualities are more representative of the sporting demands that take place during competition, these speed qualities often aren’t lost as much.

However, there is now an increase in time that athletes may be experiencing in their off-season now. Spring athletes may not get to play until the fall (or summer ball, depending on the sport/dates of re-opening).

With this said, I see a few reasons to also re-focus the training focus for athletes that may have been in season. These changes, depending on the needs of the individual, include more cardiovascular programming options within an athlete’s program; especially with this long break of an off-season that almost everyone is experiencing.

What Do Athletes Do Now?

Chances are if you’re a high school, college, or even professional athlete, you may not have access to all the weights found in a normal gym. Coupled with the fact that your normal spring sport is very likely cancelled, and the fact that most gyms are closed (or perhaps on the way to being re-opened), the ability for you to train with weights may be limited. So pragmatically, you have these variables to deal with:

  1. None or limited weights.
  2. Extra time to train other qualities that are usually not developed due to competitive demands.

Your normal phases of training during the year is usually defined as such:

Pre-COVID Phases of Training for Spring Sport Athletes (and others)

Now, your training may look like this:

COVID Adjusted Phases of Training

So what do you do now that you have over 4+ months of another off-season? Do you call it quits? Do you just stop training? Do you play Fortnite and Call of Duty instead?

Introducing Cardiovascular Training

What you can do is train in several ways not normally encouraged due to the limitations with a < 2 month window for an off-season.

If you have one block for each month of training, you can certainly induce some great benefits for yourself not just this year, but to support your training in the future.

Now, if you’re within the strength and conditioning industry, these methods should not be any surprise to you. Joel Jamieson introduced a few of these methods to the S&C world, and some methods have been around for many years before then. However, Joel Jamieson was an individual who has re-tooled these methods in a more easily understood manner, along with having a greater scientific reasoning for doing so.

Components of Aerobic Energy Production – 3 – Jamieson, Ultimate MMA Conditioning

Reasons for Training the Cardiovascular System for an Explosive Athlete

Training the cardiovascular system can allow for greater volumes of training to be experienced later on in the off-season.

For example, if you do these sorts of training now, you’re likely to induce greater benefits to the cardiovascular system.

1 – Fernandes, et al. 2011

Then, the hope is, these benefits will likely carry over later towards another block of training found in later, subsequent training blocks.

Utilizing Cardiovascular Training in a Strength and Power Block

Many subscribe to the notion that doing any type of cardiovascular work will detract from strength and power gains. Some research identified that there were decreases in forces at high velocities (think jumping for max distance) (2), but it helps to pay attention to what the original research was looking at – muscle fibers shifting to adapt towards greater oxygen demanding activities.

This reasoning makes sense, however, the purpose of training the cardiovascular system to improve efficiency of recovery, and increase potential tonnage of training along a 6-12 month timeline is not really addressed in any study.

With respect to studies, there is no greater “self-experiment” for athletes to impose cardiovascular adaptations on themselves than today, in which there has been, for the most part, a large quarantine (or stay-at-home) order in many states in the US. (At the time of this article, some orders are easing this order.)

Benefits can include greater adaptation in your heart, so that you can support greater amounts of volume. The way this occurs is by allowing your aerobic system to restore and allow for your heart rate to return to normal at a quicker rate. This is opposed to if you did not do any cardiovascular work, and your heart rate takes longer to return to a normalized resting level.

Tracking your heart rate during training sessions allows you greater insights into positive adaptations.

Measuring Progress for Cardiovascular Adaptations

So for example, say during a typical training session, your heart rate is pumping at a high rate (160-180+ bpm). Then, it takes a while for you to recover after a given bout of exercise (longer than 1 minute to return to 130bpm, for example).

After performing 3-5 weeks of a given endurance block (in addition to your original strength training sessions), that same bout of exercise brings you to 160-180+bpm, but then it takes you less than 1 minute to return to 130bpm, this indicates that your heart has adapted, and your cardiovascular system recovers faster than before.

Another method for measuring progress is to train for a given time (30, 60, or 90min), often with a sustained, activity with no breaks, and then attempt to push further in distance, or have a reduction in intensity levels while still maintaining the distance attained.

These may indicate more work is performed, while the cardiovascular adaptations are realized as well. For example:

  • It may take you 30 minutes to run 2 miles on Week 1, at an average heart rate of 160bpm.
  • Then, fast forward to Week 5 or 6, and you’re performing 2.5 or even 2.75 miles in 30 minutes with an average heart rate of 145-150bpm.

This means you are most definitely performing more work within the given time frame, or even the same amount of work with a reduced amount of intensity! All of these things mean you may be getting more efficient from a cardiovascular perspective.

Another method of identifying progress, now in the context of weight lifting, is to do simply do more work and having more volume for a given training block. By doing this, you’ll be able to create greater adaptations, because there is a greater stress induced on your system. For example:

  • Week 1: Back Squat – 3×10 reps with 120-150sec rest
  • HR average is at 170

Then on Week 6…

  • Week 6: Back Squat – 3×10 reps with 90-120sec rest
  • HR average is at 160

You’ll no longer be stressed as much by doing the same sets and reps as , and performing it at a certain weight will also not be as stressful. This indicates your body has adapted, is more efficient, and may need an adjustment of a variable for training – such as increase in weights, less rest time in between sets, or more sets and reps overall.

Programming Methods for Cardiovascular Adaptations

With all these reasons outlined, it would now help to understand how to program these methods to best experience these results.

From an energy systems training perspective, there are a few reasons why an athlete would want to improve both their cardiovascular and neuromuscular system.

  1. If an athlete can improve the functioning of their heart via eccentric hypertrophy, this will allow for a larger chamber with which the blood can fill the heart, along with improving the contractility of the heart.
  2. Focusing on improving development of the slow twitch fibers by utilizing oxygen within the working muscles.
  3. Improvements in fast twitch fibers, which will enable them to generate ATP for much longer before fatiguing.

Cardiac Output

The cardiac output method is considered high volume/low intensity, and is perhaps the easiest to perform out of all of the methods I’ve outlined so far. In essence, the purpose is to perform something relatively easy for 30-90 minutes at a time. Performed for multiple times over several weeks, this will eventually improve upon the cardiac benefits that I’ve outlined above.

Low Box Step Ups – Cardiac Output Method

3 – Jamieson, Ultimate MMA Conditioning

Tempo Method

The tempo method is one that I’ve used with great success with athletes aiming to improve their weight lifting numbers. Yes, this is primarily an article on cardiovascular benefits and adaptations, but holding a relatively heavy weight for a certain amount of reps under a strict tempo is bound to stress the nervous system, as well. For example, I’ve had athletes perform trap bar deadlifts with a 2-0-2 (or 2 seconds up, no stopping at the bottom, and 2 seconds down) for 6-8 reps. That alone sounds miserable – but it is effective for improving motor control (no loss of upper body position should be had here), along with improving grip strength (unless you are using straps). This can either be brutal, or sneakily effective – depending on how you want to use it.

3 – Jamieson, Ultimate MMA Conditioning

High Intensity Continuous Training (HICT)

This is easily one of the harder variations of training that is outlined in this article. I’ve experimented with this myself, and then transferred it to some athletes as well, and the experience alone is demanding but doable. Performing sled pushes, drags, or lunges with a weight vest for 10-20 min is brutal, and you’ll certainly feel it the next day or two. However, the benefits are truly amazing, as reduction in heart rate in comparison to previous efforts (doing the first week of HICT’s loading and timing parameters again, after completing a 2nd or 3rd week, for example) is seen here, which is amazing to think about.

3 – Jamieson, Ultimate MMA Conditioning

Then, from a week to week and exercise selection perspective for the next 6 weeks, your cardiovascular training (in addition to your normal strength training, if accessible), can look like…

Week 1+2 = Cardiac Output

  • Low Box Step Ups
  • Walking Forward Lunges (Bodyweight)
  • Stationary Bicycle / AirDyne
  • Jogging
  • Shuttle Runs (at 130-150 HR)
  • Walking with Weight Vest

Week 3+4 = Tempo Method

  • Any compound exercise

Week 5+6 = HICT

  • Sled Drag
  • Sled Push
  • Stationary Bicycle/AirDyne at High Resistance
  • Rowing/Erg at High Resistance
  • Lunges with Weight Vest

Improving the cardiovascular system’s efficiency, oxygen utilization, and increased ability to recover is important for expressing physical preparedness, especially when it comes to sports specific training.

Further, by prefacing your traditional strength block of training during the off-season with these improvements to your cardiovascular system, you’ll be more able to increase tonnage (sets x reps x weight used) for training, along with having an easier time to recover in between sets.

So, hopefully you take these elements into account before continuing with your exercise programming, next HIIT class, or video call made to only make you sweat.

As always,
Keep it funky.

MA

References

1 – Fernandes, T., U. P. R. Soci, and E. M. Oliveira. “Eccentric and concentric cardiac hypertrophy induced by exercise training: microRNAs and molecular determinants.” Brazilian Journal of Medical and Biological Research 44.9 (2011): 836-847.

2 – Wilson, Jacob M., et al. “Concurrent training: a meta-analysis examining interference of aerobic and resistance exercises.” The Journal of Strength & Conditioning Research 26.8 (2012): 2293-2307.

3 – Jamieson, Joel. Ultimate MMA conditioning. Performance Sports Incorporated, 2009.

The 90/90 Hip Lift

What is The 90/90 Hip Lift?

The 90/90 Hip Lift is an integral and foundational exercise from the Postural Restoration Institute (PRI). It is often taught in the foundational courses from PRI, and it is often where many clients, patients, and athletes begin their PRI journey. As a practitioner, I find myself coming back to this piece quite often, as it allows me to see an individual’s motor control in many specific areas and more.

The 90/90 Hip Lift is an exercise that begins in a supine position (on your back), with your feet on an elevated surface, and knees in a flexed (or bent) position.

This is an image of me teaching a 90/90 Hip Lift at a course I was helping with in California.

Sometimes you can have something in between your knees, other times not. The following article will describe more beyond just the initial position. The execution of this movement may be the most underrated aspect of this exercise, as a well executed 90/90 Hip Lift can help teach foundational lessons for further exploration later on.

Background for Using This Exercise

There are lots of reasons why someone might want to use this exercise. Reasons may involve relieving a certain region of sensory pain, improving sensory awareness of the body, and perhaps improving injuries that are often re-occurring. More specifically, the science of postural asymmetry and its effect on the body is evidenced from the Postural Restoration Institute’s multi-disciplinary approach.

At the end of the day, there are several internal and structural asymmetries that are present in the human body, along with hemispheric (or brain) asymmetries that can dictate varying function of the body. For example, there is a liver on the right side of the body, and the heart on the upper left side of the chest wall. Further, there are different attachments of the diaphragm, with the right crus of the diaphragm being stronger, broader and longer than the left diaphragm.

Breathing and posture is affected by the diaphragm's attachment. Further, there are greater differences in the right versus the left diaphragm.
The right vs left crus of the diaphragm have different attachments, which favor and give mechanical advantage to the right side due to its attachments.

In the brain, there are different structures that are more neurologically active in the right vs left hemispheres. For example, Broca’s and Wernicke’s area are found in the left hemisphere for language production, but not in the right hemisphere. This has a great impact on asymmetry for communication and interpretation of language. (1)

This is an image of a functional MRI scan of words being represented by the Broca's area and Wernicke's area, respectively.
Activity for language and communication is primarily found in the left hemisphere. (2)

With this said, the purpose of varying movements isn’t necessarily to “eliminate” any asymmetries as a cause of this and be as perfectly symmetrical as possible, because this would need for you to move your heart, liver, re-arrange your physical brain, along with removing other key body parts, but rather understand and acknowledge the body’s asymmetry with respect to performance on a daily or competitive level.

From a clinical perspective, I find myself utilizing the 90/90 Hip Lift from a foundational perspective, as it is often the first position that is introduced from a motor control position:

  • It’s easier to learn finer detailed movements, and adapt them from this position
  • You can change multiple positions of limbs, such as legs in adduction/internal rotation or the opposite leg in abduction/external rotation, while still being in the base 90/90 Hip Lift position
  • It’s perhaps easier to feel and sense muscles activating
  • It allows you to focus on breathing as well

Often I may progress from this 90/90 Hip Lift position to sidelying, seated, or even progressing to standing if it is necessary to do so.

Populations that May Benefit:

  • Athletes
  • Individuals who are placed into chronic positions (due to work, constant standing, etc.)
  • Anyone looking to improve upon their body’s musculature, particularly the hamstrings, abdominals, and gluteals
  • Populations that find themselves “neurologically stuck” in an extended posture bilaterally
  • Individuals who experience further symptoms secondary (or because of) a tight lower back, anterior hip pinching during squatting, or even hip discomfort during lunging, among other things
  • Individuals who display excessive hip or femoral external rotation (barring osteo- or bony adaptations), and are looking to improve hip internal rotation values
Left = Neutral, Right = Extended

Instructions for the 90/90 Hip Lift

From the PRI manual verbatim

  1. Lie on your back with your feet flat on a wall and your knees and hips bent at a 90- degree angle.
  2. Place a 4-6 inch ball between your knees.
  3. Inhale through your nose and exhale through your mouth, performing a pelvic tilt so that your tailbone is raised slightly off the mat.
    • Keep your back flat on the mat. Do not press your feet into the wall, instead dig down with your heels. You should feel the muscles on the back of your thighs engage.
  4. Hold this position while you take 4-5 deep breaths, in through your nose and out through your mouth.
  5. Relax and repeat 4 more times.

Understanding and Executing the 90/90 Hip Lift

It is my hope that if anything, you stick to the “algorithm” if you aren’t comfortable moving beyond this level. However, this is my site, and I’d like to provide you with my interpretation of how to improve your execution of the 90/90 Hip Lift.

Table A: Movements of the 90/90 Hip Lift with a picture of the beginning position of the 90/90 Hip Lift

With Table A, there are 8 pieces that essentially need to take place before moving on. If they don’t take place, can you really say you’ve achieved authentic muscular contractions in the correct manner?

  • Can you say you’ve achieved a posterior pelvic tilt, if indeed you haven’t achieved a posterior pelvic tilt without the hamstrings and obliques?
  • Can you say you’ve achieved compression of the anterior superior and inferior ribcage if you haven’t inhibited the pectoralis major/minor, and utilized the obliques and serratus anterior attachment on the ribcage?
  • Can you say you’ve achieved an appropriate zone of apposition if you use accessory neck musculature to help with breathing, instead of the abdominals, thoracic diaphragm, and pelvic diaphragm?

Now, with the process of troubleshooting, it is definitely okay to miss key elements, because that is the point – you haven’t learned the whole movement, so you’ll be acquiring one piece at a time. It may in fact take 5-10 minutes (or even days, weeks, or months!) to teach the sensation of what posterior pelvic tilt means without using any musculature that does not contribute, for example.

One key item to not overlook is the bolded red mechanical action of ribcage compression on inhalation – the reason being that you don’t want your ribcage to flare and expand upon inhalation, when you just achieved your position. This effectively loses the mechanical advantage that your internal obliques have on your ribcage and pelvis, along with utilizing the diaphragm to help improve upon thoracolumbar and ribcage positioning … which is the whole point of the exercise.

At the end of the day, learning the 90/90 Hip Lift will set the stage for greater stacking as we progress towards the 90/90 Hip Shift, and 90/90 Hip Shift with Integration.

So, if you only have 12.5% of Table A, that is fine, as long as you progress towards 25% the next time you practice it, then onwards to 37.5% while also retaining the original first piece to this puzzle in the process.

If you have all of these pieces except for the last two, are you truly performing a truly “legal” 90/90 Hip Lift?

Cueing and Attention

A common denominator among many of these PRI activities is the attention to detail found in the movement itself, along with the execution of these exercises from the athlete’s perspective.

When you have an activity that requires attention in more than one area, such as acquiring and maintaining sensation in hamstrings (back of your legs) and adductors (medial aspect of your legs) simultaneously, it quickly becomes apparent that some level of interoception, or a lesser-known sense that helps you understand and feel what’s going on inside your body, is necessary. However, as a coach, how do you prioritize which piece of the movement to coach? How do you allow for ease of understanding? Is interoception detrimental towards performance (similar to internal attentional focus)?

Something familiar for coaches to recognize and coach is a back squat. At the end of the day, it is simple. It involves a level change (standing tall to sitting down) with a fixed torso (that does not fold nor bends during the movement), and there happens to be a barbell on your back. Initially it is as easy as that, but then eventually you’ll need to pay attention to:

Squatting is squatting … right?
  • Hand position
  • High bar vs low bar
  • Foot width and position
  • Intra-abdominal pressure
  • Visual gaze

… among many other nuances found in a wide variety of successful squatting.

However, despite all of these individual pieces that can be fine tuned in the back squat, how can any individual successfully back squat when there can be anywhere from 5 to 8 items to pay attention to in the squat?

This answer lies in the sensory processing and motor output associated with different movements and is analogously related to how the 90/90 Hip Lift can progress and advance beyond its simplistic nature.

Understanding Sensation and Sensory Processing

“… The nervous system extracts only certain pieces of information from each stimulus while ignoring others… Thus, we receive electromagnetic waves of different frequencies, but we see them as colors… Colors, tones, smells, and tastes are mental creations constructed by the brain out of sensory experience. They do not exist as such outside of the brain.”

(Kandel et al.) (3)

Writing a whole bit on perception in less than a paragraph would be a disservice since there are literally books upon books on the topic, so I’ll save that document for another 3000+ (or multiple articles) word article. However, understanding how the perceptual system is developed as you grow and experience more and more things in your life is important. The things you feel, smell, hear, see, and taste are all important factors for helping you do several things – mainly, to learn about and navigate your environment.

In the field of strength and conditioning, the practice of improving upon the sensitivity of how sports specific movement is practiced, trained, retained, and transferred is just beginning. Meanwhile, the field of motor control and motor learning has been thriving for many years. An important topic within motor control is “attention of focus” – and it splits into two distinct definitions of internal and external attention of focus. Colloquially, it is known as internal and external cueing.

Internal attention of focus is directed toward components of the body movement, whereas interoception’s definition and scope of use “ranges from the sense of agency, to the physical cause of a sensation, the ontogenetic origin, the efferent innervation, and afferent pathways of the tissue involved amongst others.” (4)

These are two vastly different meanings, as sense of agency has implications into the developmental processes of an individual. During instruction, if the practitioner or coach delivers internal cueing as a method for feedback, there is a high price in describing the processes involved with your body, namely a reduction in performance. (5) (6)

However, what happens if there is no concept of what your knee is, or what your hamstrings look like, or what your body is doing from a proprioception point of view? (7) Can you even begin to conceptualize what body parts you are being cued to pay attention to if you aren’t aware that you have different body parts to begin with?

Motor learning can arrive through several means. In this particular type of exercise, motor learning is encouraged by…

  • Being cognizant of a sensation,
  • Shifting that sensation into the subconsciousness without losing the output of the said sensation,
  • And then carrying onwards to another integrated movement (with greater complexity).
Understanding memory science can glean greater insights as to how the subconscious and consciousness interact.

Image from Simply Psychology – Working Memory

For example, in the 90/90 Hip Lift:

  1. You may become acutely aware of your hamstrings during the posterior pelvic tilt as your first step.
  2. Then, you decide to move onwards to your abdominals and ribcage compression during exhalation.
  3. During this, you may lose sensation of your hamstrings, but finally achieve the sensation of “tightness” in your abdominals during exhalation.
  4. Afterwards, your goal is achieve both sensation of your hamstrings and your abdominals simultaneously.

Ta-da! You’ve completed a 90/90 Hip Lift successfully.

How do you feel?

In Review…

  1. There are inherent structural asymmetries present in the body.
  2. Before tuning your body to these asymmetries and its impact on the musculoskeletal system, understanding the base position of the 90/90 Hip Lift is necessary before continuing towards advanced activities.
  3. If you achieve one out of the eight pieces found Table A, that is fine, so long as you own and retain that without any other compensations.
  4. The next step is to attain a second piece (in addition to the first piece).
  5. Then, your next step is to sense and obtain the third piece, while still actively holding all of the other pieces.
  6. And finally, obtain the fourth piece, while still actively holding all of the other pieces.
  7. The bigger purpose is to move in one whole pattern, instead of sequentially acquiring each piece.
  8. Sensory processing is integral towards improving the motor output.
  9. Interoception is different than internal attention of focus.

Now, this sounds like a big endeavor when it is laid out like this, and that is the point.

Attempting to achieve integration of many pieces is the goal. When it comes to sensing your own body, you’ll often find that certain sensations will fade in and out of your awareness – which is the point. For example, conscious and subconscious perception allows you to sit and stand where you are without being cognitively aware of these surroundings, but cognitive sensation of these sources of stability may be brought to mid if you feel unease or maybe slip while you walk.

The purpose of the 90/90 Hip Lift, 90/90 Hip Shift, and many other exercises within this realm, are to improve upon how you sense your own body before creating a greater task for motor output throughout your environment.

Stay tuned for the next article, where I’ll go over what the 90/90 Hip Shift covers and how to properly execute it.

As always,
Keep it funky.

References

1 – Toga, A., Thompson, P. Mapping brain asymmetry. Nat Rev Neurosci 4, 37–48 (2003). https://doi.org/10.1038/nrn1009

2 – Makovskaya, Lyudmila, et al. “Localization of Broca’s and Wernicke’s areas with resting state fMRI.” European Congress of Radiology 2016, 2016.

3 – Department of Biochemistry and Molecular Biophysics Thomas Jessell, Steven Siegelbaum, and A. J. Hudspeth. Principles of neural science. Eds. Eric R. Kandel, James H. Schwartz, and Thomas M. Jessell. Vol. 4. New York: McGraw-hill, 2000.

4 – Schmitt, Daniel. “Insights into the evolution of human bipedalism from experimental studies of humans and other primates.” Journal of Experimental Biology 206.9 (2003): 1437-1448.

5 – Zachry, Tiffany, et al. “Increased movement accuracy and reduced EMG activity as the result of adopting an external focus of attention.” Brain research bulletin 67.4 (2005): 304-309.

6 – Wulf, Gabriele, Barbara Lauterbach, and Tonya Toole. “The learning advantages of an external focus of attention in golf.” Research quarterly for exercise and sport 70.2 (1999): 120-126.APA

7 – Kuo, Arthur D. “An optimal state estimation model of sensory integration in human postural balance.” Journal of neural engineering 2.3 (2005): S235.