4 Common Errors Youth Athletes Make

At Cressey Sports Performance, speed and agility are all the buzz now. In fact, we are so focused on improving movement quality, that we often prescribe for our professional athletes two days quite literally focused on the movements outside of just lifting heavy weights.

It is one thing to create the environment for lifting weights, and another to take that next step and help an athlete learn how to sprint better, decelerate better, and improve their overall movements that you know will transfer to their sport.

Here are a few things that I see on a daily basis when it comes to errors that our athletes make.

Not Being Aggressive Enough with Arm Swing

This is a common item, as whenever we begin teaching sprinting drills at CSP, most often the athlete just simply hasn’t been instructed on what to do with their hands. Most of the time sport coaches will cue feet and knee mechanics, but not many think to also cue hands to help improve motion in either a forward or lateral direction.

This is a simple fix, however.

Simply cue the athlete to bring their hands back behind their torso by any means necessary. You can use tall kneeling drills, seated drills, or external cues to help improve this process.

Arm Swing - Corrections
Left (Correct): Top Hand placement is correct, and bottom arm angle is further back than the right. Right (Incorrect): Hand placement is more forward than left picture, and down arm’s angle is less than left.

Lack of Positive Shin Angle During Linear Acceleration

Another item is what to do with their body when they are “getting out of the hole.” There are many reasons why someone may look to improve their “shin angles” – they might be chasing an opponent, they are rushing back to defense (basketball), or any slew of items in which linear mechanics are of the most importance.

You see, when talking about speed drills, there needs to be an understanding that everything needs to contribute to going as fast as you can. If 3 out of 4 pieces of the puzzle are there, but that last piece is nowhere to be found, then you may be left in the dust by an athlete that could be stronger, faster, or more technically efficient.

Linear Acceleration
Left (Correct): Positive shin angle leads to better forward motion of the athlete. Right: Negative or neutral shin angle reflects deceleration or slowing down.

This item talks about the ability for ground reaction forces to displace in a horizontal fashion. If you can imagine, there needs to be an equal and opposite force to whenever you move. So if you have a “knees over your toes” angle, you will tend to “fall” forward.

This can reinforced through several drills:

  • Lean-Fall-Sprint
  • Half Kneeling Starting Positions (into a Sprint)
  • Push Up and Go Starting Positions (into a Sprint)
  • Jump Back into a Sprint (in which the positive shin angle is created by a reactive step)
  • Prowler Pushes/Marches

… among many other drills.

If you don’t have a positive shin angle, you will be “telling” your body to decelerate automatically, and your lower half of your leg is no longer contributing to speed and acceleration.

Lack of Positive Shin Angle During Lateral Deceleration

This is very similar to the other item mentioned above, although the spin on this error is referring to what occurs during side to side deceleration.

Many drills and tests even separate the good from great, such as the Pro Agility Shuttle Test or 5-10-5, in which you are decelerating several times to identify how good your mechanics are for acceleration and deceleration.

This shin angle is important, because this can mean the difference between being cut off, or making an important play whether you are on the field, court, or rink.

Keep in mind this is no encouraging a genu valgus or simply knees collapsing in towards each other. This purpose is to improve your abilities to absorb force, and decelerate appropriately without any extraneous steps.

Lateral Deceleration Collage
Left (Correct): The positive or acute shin angle will reflect the ability for the athlete to change directions quicker than the picture on the right. Right (Incorrect): The positive shin angle also reflects oversupination in which the athlete loses footing and could possibly roll an ankle!


Lack of Head Movement During Deceleration

This last item is one that is not often talked about, because it is not thought about that much.

If I can summarize this in one phrase – where the head goes, the body follows.

So if you are talking about acceleration or deceleration, your eyes and head position are vastly important towards improving your mechanics.

In fact, it might be one of the most important items, for the mere fact that you have many vestibular related items in your noggin, along with needing the ability to view and be aware of what is going on the field. If you are caught up looking down at the grass, you won’t be able to see what is going on player wise, positions that may be compromised, ball placement, among several different items.

So, barring any negative detriments towards tactical or strategic items (head fakes in basketball), if you can lead with your eyes towards the destination you want to go.

Gaze

  • If you want to jump in the air, you need to look up (barring keeping your eyes on the ball).
  • If you want to go forward, look down (re: acceleration).
  • If you want to change directions, shift your eyes towards that direction, even if your body is going in another direction.

These are just a few items that I’ve picked up along my travels as a strength coach and trainer for several different sports and clients. I believe you can learn so much more by signing up to be a Certified Speed and Agility Coach by Lee Taft. I’ve had the blessing of being the “model” for this product, and we had a lot of time to discuss other cool things outside of filming. Please check it out, and remember I do get a cut if you do sign up through my affiliate links. Thank you!

CSAC_productimage

As always,

Keep it funky.

P.S. This speed and agility course ends today, Friday, January 29, so make sure to sign up because the powers that be will be shutting down sign-ups afterwards!

–> Become a Certified Speed and Agility Coach today! <–

MAsymbollogo

One Weird Trick: Installment 5 – Fix Your Overhead Squat

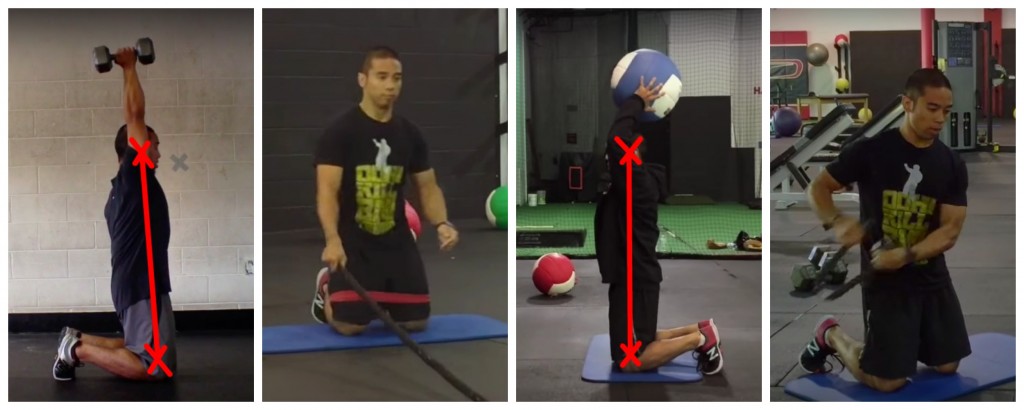
Introducing the Tall Kneeling Position, and How It Can Fix Your Overhead Squat

Watch this video to make sure you do the tall kneeling position correctly, and read below to learn how this drill can fix your overhead squat movement!

I’ve been blessed to have shared the company of several really smart physical therapists, personal trainers, and strength coaches of all types of backgrounds. I love how we can all see one specific issue, and come up with several different solutions for that same problem.

Inputs Outputs

One of the things that has puzzled many of my colleagues is the inclusion of a tall kneeling position in an exercise program. First, what is the tall kneeling position? And should I include it in my exercise program?

Essentially, the tall kneeling position involves assuming a bilateral stance on your knees.

Next, programming it in your program depends on if you need it or not from an assessment point of view.

Whenever I program a tall kneeling position into a program, more often than not that individual presented lack of control with their overhead squat.Overhead Squat

At its simplest, the overhead squat is a bilateral stance movement pattern. In the squat pattern, you are learning to change levels. And by levels, I mean starting tall, and ending up in a lowered stance.

In your beginning stance, you are theoretically in full hip extension while in an upright and standing position.

As you descend and change levels, you are eccentrically loading the posterior chain musculature, maintaining a static torso position, along with going into hip flexion.

Squat

In the tall kneeling pattern, you are simply challenging the hip extension movement pattern. There is no deep excursion into hip flexion (although, you can always go into a slight hip flexion pattern by sitting your butt to your heels).

Comparing Tall Kneeling to SquatSo while an overhead squat can be limited for many reasons – lack of hip mobility, lack of hip control, lack of ankle mobility/stability, which are mainly lower body problems – there are also other reasons that an overhead squat can exhibit a dysfunctional pattern in an individual, namely torso and upper body related problems.

I highlighted and bolded the phrase “maintaining a static torso position” above because, from my point of view, the tall kneeling pattern’s main purpose is to maintain a static torso position while moving in various manners.

When to Use the Tall Kneeling Position

Well, an easy way to see if a drill is right for you is to see if you fit a specific type of criteria. I can’t diagnose from the internet, but I can provide better ways to move about based on your movement, such as during your overhead squat.

  1. Perform an Overhead Squat.
  2. If you have issues maintaining an upright torso, or you tend to dive forward immediately in your squat, elevate your heels.
  3. Perform the overhead squat again.
  4. If the position is not improved, then the tall kneeling position may be appropriate for a few of your drills.

Here are a list of other ways you can challenge torso stability:

  1. Tall Kneeling Cable Chop
  2. Tall Kneeling Pallof Press
  3. Tall Kneeling Med Ball Chest Pass
  4. Tall Kneeling Single Arm Rope Drills
  5. Tall Kneeling DB Overhead Press

… among many, many other drills and exercises!

As always,

Keep it funky.

MAsymbollogo

P.S. In fact, when you think about it, the Glute Ham Raise is also an opportunity to challenge a “Tall Kneeling” position, albeit you are moving at the posterior chain!

My Favorite Exercise Combinations: Installment 12 – The Hip Bone is Connected to The Knee Bone

Before I begin, I just want to comment and mention that many individuals want to begin talking about pathoanatomy and all of the complex items that happen in the body, but not many even master the basics and fundamentals before moving onto said items!

In fact, Tony Gentilcore had a funny quip to a tweet I had ranting about this very item.Tony G Tweet

With that under your belts, let’s dive into my newest and most favoritest exercise combination!

The Hip Bone is Connected to the Knee Bone

One common theme that happens quite a bit in many populations that I come across involves the knees exhibiting genu valgus. This is a fancy schmancy word meaning the knees cave in – this could be due to a few things:

1. Increased q-angle, in which a line is drawn from the anterior superior iliac spine (ASIS) to the center of the patella, and another line is drawn from the center of the patella to the middle of the femur.

qangle

2. Over-pronation of the medial arch of the foot, in which the arch of the foot is rolled inwards. If the foot collapses, the tibias could lose integrity and also fall in height as well, thus causing the patellas to fall towards one another.

Arch vs No Arch

3. Lack of hip internal rotation, which could be due to several factors, such as:

  • Lack of abdominal contribution in controlling the motion of the pelvis during gait
  • Lack of strength in glute medius
  • Lack of space in the posterior portion of your hip capsule due to congenital (or you were born with it) reasons
  • The individual does not know how to control the range of motion given to them

…among many others such as contact and non-contact injuries.

Look here for more information on hip internal rotation.

Observations vs Pragmatic Actions

So the mere observation of said information does not help us, rather we (you and I) can intervene in a few ways:

  1. Perform rehab like exercises in order to improve what we are looking at.
  2. Improve gait patterns (over-pronation, reduce postural swinging during gait, etc.)
  3. Improve the individual’s ability to control their body during athletic movements

Today I’ll be going over how to improve option three, in which I introduce the single leg hop where the landing is “stuck,” paired with a single leg squat, or bowler squat, with a subsequent medial band pull.

The single leg hop is a great regression or even beginning assessment tool to see how an individual interprets how to accelerate away from the ground, along with how they decelerate and negotiate gravity.

When an individual lands, a few incorrect items may occur:

  1. Lack of sticking landing (hopping instead of absorbing force)
  2. Overpronation
  3. Knee collapse
  4. Landing too “tall” or high, as opposed to a lowered position

Long story short, I am looking for alignment of the foot, knee, and hip.

Knee Alignment - Sagittal
Left: Good alignment when landing from a vertical hop. Right: Bad alignment when landing from a single leg vertical hop

Further, starting and ending with a lowered position allows an individual to react appropriately with respect to athletic endeavors – if the athlete lands in a higher position, there is less ability to decelerate using the posterior chain/glutes, and more likelihood the person will have to lower themselves in order to get faster, which takes time they could have saved if they just landed lower to begin with.

The bowler squat with a medial band pull requires the individual to maintain all of these alignment items, along with maintaining a lowered center of gravity.

Single Leg Medial Band Pull
The band is pulling the outside knee into valgus/collapse. The brain will recognize this and fight back, hopefully.

I’d also increase the demands by requiring the athlete to pause for 2 seconds at the bottom position, which will take any momentum out of the equation, and challenge their core integrity.

Note: When you have the band pulling on the leg, make sure your most outside leg has the band pulling them inwards toward the midlineotherwise you are assisting your knee in maintaining appropriate alignment. The purpose is to challenge the vestibular and nervous system by pushing the body out of alignment!

How Can I Program This?

I believe this can be a great precursor towards improving frontal plane development, or even single leg forward hops or bounds. For this reason using this as a “reminder” in the warm-ups may be the best bet.

A1. Single Leg Hop (Stick Landing) – 3×5/s

A2. Bowler Squat with Medial Band Pull with 2 Sec Pause – 3×4/s

Make sure to use a slightly less challenging band, because a very strong, or one inch or thicker band, may be too difficult and might hurt more than help!

As always,

Keep it funky.

MAsymbollogo